 |
Extended Walkthrough
|
| |
This file will walk you through the process of creating a large,
polished mission. It assumes you've already read the Quick Start and the sections on Basic Concepts, The
Toolbar, and Menu Commands. This may
take a couple of hours, so pour yourself a beverage.
If you want to play the mission before we reveal the plot, run
FreeSpace 2. Go into the Tech Room, select Mission
Simulator and pick
Single Missions. This is the mission "Shipyard
(completed)". If you get confused about something in the
walkthrough, you can open the file
shipyard-completed.fs2 in FRED2.
The sections of this file are:
|
Planning the Mission
|
| |
Before opening FRED2 to build a mission, it is worth spending some
time with a pencil and paper planning the mission. What forces are
involved, and what are they trying to accomplish? What events will
happen over the course of the mission?
On the other hand, you will inevitably make some changes as you
build the mission. Perhaps you will discover that it is unbalanced
(the same side always wins), or that it takes too long. These
things can usually be fixed by changing the exact number and type of
ships involved.
In this mission, the (single) player is defending a GTVA shipyard.
The shipyard consists of a GTI Arcadia and two GTI Ganymede
installations. There is a GTD Orion destroyer docked in one of the
rings. There are also some cargo containers and transports
scattered about.
The shipyard is attacked by the Neo-Terran Front. There are
two parts to the attack.
In the first part, a pair of cruisers (a
GTC Leviathan and a GTC Aeolus) and some fighters come at the
shipyard. They player and the other friendly fighters engage the
enemy fighters, while a GVCv Sobek corvette meets the cruisers in
beam combat.
This is just a diversion for the second part of the attack. Having
drawn the GTVA forces to one end of the shipyard, the Neo-Terrans
bring in some transports (GTT Argo) full of marines to steal the docked
Orion-class destroyer. The transports have their own escort
fighters, of course.
A very skillful player (or one who knows what's going to happen)
might be able destroy the transports quickly. If this happens, the
NTF abandons the attack.
If the NTF marines manage to take over the destroyer, they bring its
engines on line and head for the local jump node. They player must
disable and disarm it before it jumps out.
|
Stationary Objects
|
| |
You'll begin by placing large, stationary objects like
installations. Laying out the "terrain" for the mission will help
you decide where to place other things later.
Before starting, read about the Objects
Editor and the Ships Editor.
Now, open FRED2. The Arcadia installation is at the center of the
action, to it makes sense to put this at location (0, 0, 0). You'll
need to get the player away from that area, so drag the player's
ship a few kilometers away, to someplace like (0, 0, -3000). While
you're at it, form a wing containing that ship and call it Alpha.
Place the objects listed in the table below. Use the Objects Editor to make their positions
exact.
| Object |
Class |
Position |
Notes |
| GTI Vulcan's Forge |
GTI Arcadia |
0, 0, 0 |
Escort ship, priority 80 |
| Ring 1 |
GTI Ganymede |
3000, 0, 0 |
|
| Ring 2 |
GTI Ganymede |
-3000, 0, 0 |
Protect ship |
| GTD Relentless |
GTD Orion |
-3000, 0, 0 |
Protect ship
Escort ship, priority 80
Velocity: 0
Engine subsystem strength: 0
Initial orders: play dead, priority 50
Hotkey: F12
|
Ring 2 and the Relentless are protected so that the NTF won't shoot
at them. (Shots at Ring 2 might hit the Relentless.) If the
Relentless is taken over, GTVA ships shouldn't try to destroy it; the
protection will be helpful there, too. Vulcan's Forge and the
Relentless are both escort ships, so their hull strength will show
up on the right side of the player's HUD. The Relentless is
supposed to be off-line with just a skeleton crew, so it has
velocity zero, disabled engines (and hence no engine glow), and
orders to play dead.
Finally, we let the player target the Relentless by pressing F12.
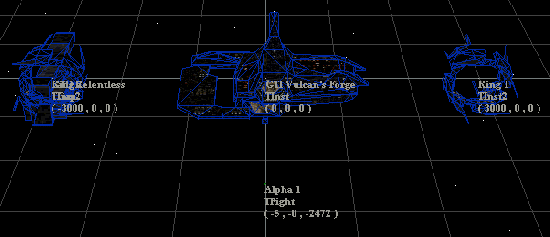
Depending on your camera angle, the shipyard should now look
something like this:
This is a good time to save the mission and test it out in FreeSpace
2. Save early and often!
Read about the Waypoint Path
Editor; you'll need it to rename a jump node in a moment.
Here are some more objects to place:
| Object |
Class |
Position |
Notes |
| TC-TRI 5 |
TC-TRI |
1000, -1500, 3000 |
Cargo: Hull Plating |
| TC-TRI 6 |
TC-TRI |
1500, -1500, 3000 |
Cargo: Beam Weapons |
| TC-TRI 7 |
TC-TRI |
2000, -1500, 3000 |
Cargo: Warp Coils |
| TC-TRI 8 |
TC-TRI |
2500, -1500, 3000 |
Cargo: Scrap Metal |
| TC-TRI 9 |
TC-TRI |
3000, -1500, 3000 |
Cargo: Missiles |
| TAC 1 10 |
TAC 1 |
4000, 0, -1000 |
Cargo: Inertial Dampeners |
| TAC 1 11 |
TAC 1 |
4000, 250, -1000 |
Cargo: Subach HL-99 |
| TAC 1 12 |
TAC 1 |
4000, 500, -1000 |
Cargo: Cables |
| GTD Triumphant (1) |
TC-TRI |
3000, 0, -500 |
Alt name: (under construction) |
| GTD Triumphant (2) |
TC-TRI |
3000, 0, 0 |
Alt name: (under construction) |
| GTD Triumphant (3) |
TC-TRI |
3000, 0, 500 |
Alt name: (under construction) |
| GTD Triumphant (4) |
TC-TRI |
3000, 0, 1000 |
Alt name: (under construction) |
| GVCv Pomotep |
GVCv Sobek |
Approximately
-2000, 2000, 4000,
pointing toward
GTI Vulcan's Forge |
Escort ship, priority 80
Player orders: none
|
| Jump Node |
Jump Node |
-3000, 0, 10000 |
|
Save the mission again, and try it out if you wish.
|
Large Ship Movements
|
| |
While FreeSpace 2 is really about fighters and bombers, it would
just be a series of isolated dogfights if it were not for transports
and capital ships. These larger ships provide obstacles, visual
variety, and plot points. With FRED2, you can make these ships behave
intelligently (or at least appear to do so).
The shipyard mission will have four sequences of large ship
movement. They are described below, in order of increasing
complexity.
Orbiting Transport
The first scripted sequence is a transport repeatedly flying
around a series of waypoints.
Place the objects listed below.
Remember that, to add a waypoint to a
path, the previous waypoint in the path has to be selected.
| Object |
Class |
Position |
Notes |
| Waypoint 1:1 |
Waypoint |
Approximately 500, 0, -1000 |
|
| Waypoint 1:2 |
Waypoint |
Approximately 1500, 1000, -1000 |
|
| Waypoint 1:3 |
Waypoint |
Approximately 2500, 0, -1000 |
|
| Waypoint 1:4 |
Waypoint |
Approximately 1500, -1000, -1000 |
|
| GVT Amazonia |
GVT Isis |
Approximately -300, 0, -1500,
pointing to Waypoint 1:1 |
Initial orders: waypoints, Waypoint path 1,
priority 50
|
Save the mission and go watch the transport do its thing. Notice
that it will keep travelling around the waypoints over and over;
this is the difference between waypoints and
waypoints-once.
If you get impatient while watching the GVT Amazonia, remember that
you can change the time scale during the mission; the default keys
for this are < and > (don't forget to hold down Shift). This
is very useful when scripting large ship movements.
Freighter Grabbing Cargo and Jumping Out
The next bit of traffic in the shipyard is a freighter that docks
with one of the cargo containers and then jumps out. Here is the
freighter:
| Object |
Class |
Position |
Notes |
| GTFR Pelican |
GTFR Triton |
Approximately 2000, -1000, 200,
pointing toward TC-TRI 9
|
Initial orders: dock, TC-TRI 9,
cargo dock 01, cargo dockpoint, 50 |
We also need to tell the Pelican to warp out after it picks up the
cargo container. To do this, we'll need a SEXP. Go read about SEXPs now.
Use this SEXP for the Pelican's Departure Cue:

Save the mission and go experience the unbridled excitement of
interstellar commerce.
NTF Attack: Part 1
You're probably about ready for some combat now. Never fear, you're
about to bring in the big guns.
Two NTF cruisers are going to warp in and attack Ring 1. First,
just place these ships and give them attack orders. (FRED2
may incorrectly claim that you're telling them to attack their own
team. Ignore this; it happens because some details don't get
updated until you close the Ships Editor.)
| Object |
Class |
Position |
Notes |
| NTC Hugin |
GTC Leviathan |
5100, 2900, 4600
|
Hostile
Initial orders: attack Ring 1,
priority 50
Escort ship, priority 50
Hotkey: F9
|
| NTC Munin |
GTC Aeolus |
5100, 2800, 4200
|
Hostile
Initial orders: attack Ring 1,
priority 50
Escort ship, priority 50
Hotkey: F10
|
Save the mission. If you try it out, you will notice several things
wrong:
- The attacking ships are present right at the beginning of the
mission.
- They don't stay together; the Munin moves much faster than
the Hugin.
- They don't use their beam weapons.
To fix these problems, you'll have to use events. Go read about the
Events Editor now.
First, you want the enemy ships to arrive a short while after the
mission starts. You could do this by directly adjusting their
Arrival Cues in the Ships Editor. It is a better idea
to create an event for the arrival of the NTF, and have the ships
arrive when this event occurs. This way, if you decide to change
the arrival time, you can do it in one place, rather than editing a
bunch of different ships. Also, you can have the event happen
almost immediately
when you're testing things out, then later move it back to a more
reasonable time.
Create this event:

Use this SEXP for the Arrival Cue on each of the NTF
cruisers:

Now for the speed problem. You can limit a capital ship's speed
when it is flying waypoints.
Create a couple of waypoints, making sure they're on different paths.
| Object |
Class |
Position |
Notes |
| Waypoint 2:1 |
Waypoint |
3100, 900, 600
|
|
| Waypoint 3:1 |
Waypoint |
3100, 800, 200
|
|
Change the Hugin's initial orders to waypoints-once,
Waypoint path 2, priority 50. Similarly, have the Munin head for
Waypoint path 3. For good measure, use the Objects Editor to
point each of these ships at the waypoint to which it's going.
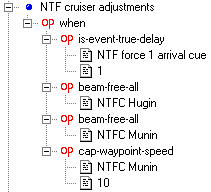
Now, you can create an event that will slow down the Munin and free
the beam weapons on both cruisers. (Beam weapons are locked off by
default.) You'll need to use Add Operator to do it:
Save the mission and test it.
This is a good time to make Alpha 1 Invulnerable, so you can
watch the action without fear of being destroyed.
A one-sided capital ship battle isn't very interesting, so it's time
to bring the GVCv Pomotep into the action. Since the cruisers are
faster, we can't just order the corvette to attack them. However,
we can have it head for a waypoint near theirs, which will look just
as good to the player.
| Object |
Class |
Position |
Notes |
| Waypoint 4:1 |
Waypoint |
3500, 500, 800
|
|
Add this event:
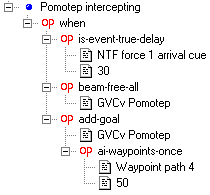
Now the Pomotep will move the "intercept" the cruisers 30 seconds
after they arrive.
To make the story more interesting, let's say the Pomotep has
recently returned from battle. In the Ships Editor, set its
hull strength to 82. You could go through and damage each of
the various subsystems,
but there's a better way. Insert this event at the beginning of the
event list:
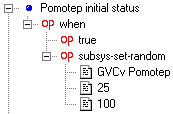
This will randomly set the strength of each of the Pomotep's
subsystems to somewhere between 25 and 100 percent.
Save the mission and go enjoy the fireworks.
NTF Attack: Part 2
The last (and most complicated) scripted sequence in this mission is
the NTF transports responsible for capturing the GTD Relentless.
These transports will be in a wing, so you'll need to read about the
Wings Editor.
Place four GTT Argo transports around position (-2000, -2000, 1000)
and group them into Sleipner wing. You can set some things, such as
the Hotkey, in the Wings Editor. For other things,
like cargo, you'll have to mark all four ships and then use the
Ships Editor.
| Object |
Class |
Position |
Notes |
| Sleipner wing |
GTT Argo (x4) |
Approximately -2000, -2000, 1000,
pointing to GTD Relentless
|
Hostile
Hotkey: F11
Cargo: Marines
Cargo not known
|
Create an event called "NTF force 2 arrival cue". Make the SEXP identical to "NTF
force 1 arrival cue" by using Copy and Paste. (We'll
change the time on this event later.) Set the
Arrival Cue for Sleipner wing so that they arrive when this
event becomes true. Be sure to do this in the Wings Editor,
not in the Ships Editor.
Give Sleipner 1 (but not the other Sleipner ships) initial
orders to dock with the GTD Relentless. Only one ship can dock with
the Relentless at a time, so the others will have to take their
turns.
The next bit of SEXP wrangling is a little complicated, so this is a
good time to save the mission.
Suppose it takes two transports full of marines to take over the
Relentless. If this happens, there's no way to know in advance
which two transports will be responsible; perhaps the player will
destroyer Sleipner 2, but Sleipner 1 and Sleipner 3 will
successfully dock. You need a way to keep track of how many
transports have docked.
Fortunately, FRED2 lets you store values like this in variables.
Right click on any event in the Events Editor and select
Add Variable. Call the new variable DockCount,
and give it a default value of 0.

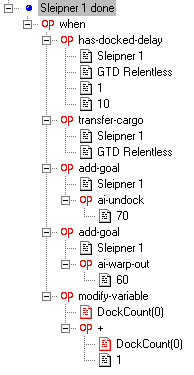
Now, when Sleipner 1 finishes its work (say, 10 seconds after it has
docked), it should do the following:
- Transfer its cargo to the GTD Relentless
- Get new orders to undock and warp out
- Add 1 to the value of
DockCount
Here's the event to do all that:
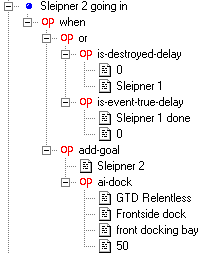
Sleipner 2 should move in as soon as Sleipner 1 either is destroyed
or finishes its job:
Create two more events, "Sleipner 3 going in" and "Sleipner 4 going
in". These must appear right after "Sleipner 2 going in", and be
Chained so that they will happen in order. (Without
chaining, Sleipner 4 would head in as soon as Sleipner 3 was
destroyed, regardless of whether one of the other two transports was
already docked with the GTD Relentless.) Make liberal use of Copy and Paste, but don't forget to edit
the SEXPs so that each one refers to the correct ships within
Sleipner wing.
Create three more events: "Sleipner 2 done",
"Sleipner 3 done", and "Sleipner 4 done". These are basically
identical to "Sleipner 1 done", except that each refers to a
different transport in the has-docked-delay,
transfer-cargo, and add-goal sub-SEXPs.
Save the mission and test it. You may want to fly a bomber so that
you can blow up one of the transports and watch the next one go in.
You might also try scanning one, and noticing that its cargo changes
just before it undocks from the Relentless.
Okay: the transports are doing their little dance now, but it's not
having any effect on the GTD Relentless. Time to change that.
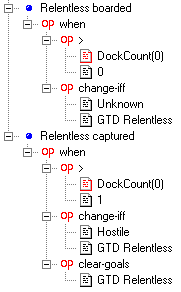
After the first transport is done, the Relentless should change from
Friendly to Unknown. This will make it appear purple rather than
green on the player's radar. After a second load of marines, the
destroyer should become Hostile. Also, its play dead
order should be cleared; the NTF marines are using the Relentless'
weapons to help with the space battle. The Relentless' beams will
stay locked; the story is that they haven't been installed yet.
Two events will take care of all this:
After another 45 seconds, the marines get the Relentless' engines
back on line and head for the jump node. To make the destroyer
appear to jump out in the jump node, you'll need to add a waypoint
on the near side. (For a smaller ship, you could put the waypoint
inside the jump node.)
| Object |
Class |
Position |
Notes |
| Waypoint 5:1 |
Waypoint |
-3000, 0, 7000
|
|
Here's the event:
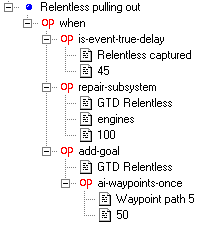
Change the Relentless' Departure Cue to:

Save the mission and try it out again. Target the GTD Relentless
and use 'S' to cycle through subsystems until the engines are
targeted. Watch the Relentless change from Friendly to Unknown to
Hostile. If you're behind it, you'll be able to see the destroyer's
engines fire up as it heads for the jump node.
Have a few GTVA personnel get off the Relentless in an escape pod:
| Object |
Class |
Position |
Notes |
| GTEP Escape Pod |
GTEP Hermes |
(anywhere)
|
Arrival cue: Docking bay of GTD Relentless, 10 seconds after
event "Relentless captured" becomes true
Initial orders: warp, priority 50
Escort ship, priority 100
|
The escape pod will probably be shot down by the relentless, but it
might escape if there are friendly fighters in the area distracting
the destroyer.
Sleipner wing has no reason to stick around once the GTD Relentless
is captured. Change the Departure Cue for Sleipner wing to
that they'll leave as soon as the event "Relentless pulling out"
becomes true. (This event is used, instead of "Relentless
captured", so that none of the transports are docked with the
destroyer when they jump out. Otherwise, they'd carry the destroyer
with them into hyperspace! While the NTF might like this outcome,
it's not realistic.)
There are several possible outcomes to the mission:
- Sleipner wing might lose so many ships that they can't take
over the Relentless
- The Relentless might be destroyed
- The Relentless might be successfully stolen
- The Relentless might be taken over, but then disabled and
disarmed
As soon as any of these things happens, any other NTF ships should
leave.
Here are events for the first three possibilities:
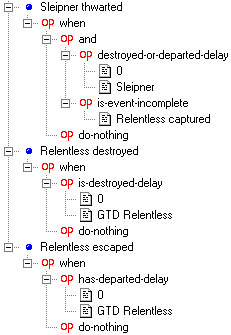
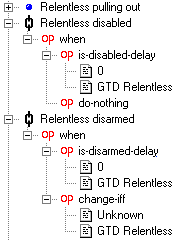
For reasons that will become clear when you add directives, the last case should be handled by
two separate, chained events. Use Insert Event to add these
two events right after "Relentless pulling out", and make sure they
are Chained:
Add one more event, "Relentless out of picture", which becomes true
as soon as any of "Sleipner thwarted", "Relentless
destroyed", "Relentless escaped", or "Relentless disarmed" becomes
true. (Hint: you'll need to use an or with four
arguments.) Make this the Departure Cue SEXP for each of the
NTF cruisers.
Save and test the mission. Notice that the cruisers jump out as
soon as fate of the Relentless is decided.
Heave a sigh of relief that the hard part is over. Take a break,
give your eyes and hands a rest, and talk to another human if one is
available. When you're ready, come back and finish the walkthrough.
|
Directives and Objectives
|
| |
Directives are the instructions that appear on the left side of the
player's HUD. Objectives are the things that have to be
accomplished for the mission to count as a success.
Directives are added in the Events Editor. First, add some
Directive Text to events you've already built:
| Event |
Directive Text |
| Relentless disabled |
Disable GTD Relentless (F12) |
| Relentless disarmed |
Disarm GTD Relentless (F12) |
Because of the chained events, the first directive won't appear
until the Relentless pulls out, and the second won't appear until
the Relentless is disabled. (If the player Relentless is disarmed
and then disabled, the second directive will be completed
as soon as it appears.)
Add a new chained event "Player returned to base" right after
"Relentless out of picture". It should become true when Alpha 1
departs. Give the directive "Return to base".
Add these two events, chained after "NTF force 2 arrival cue":
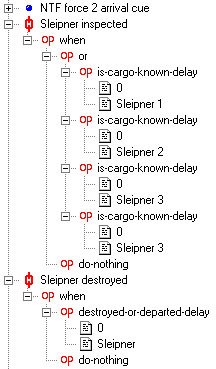
The first one should have the directive "Inspect any Sleipner
(F11)", and the second one "Destroy Sleipner (F11)".
Go read about the Mission
Objectives Editor.
Create two objectives. The first is a primary goal to protect the
shipyard; this is accomplished if either Sleipner is thwarted or
the Relentless is disabled and disarmed. It's worth 1000 points,
and it should get a completion sound.
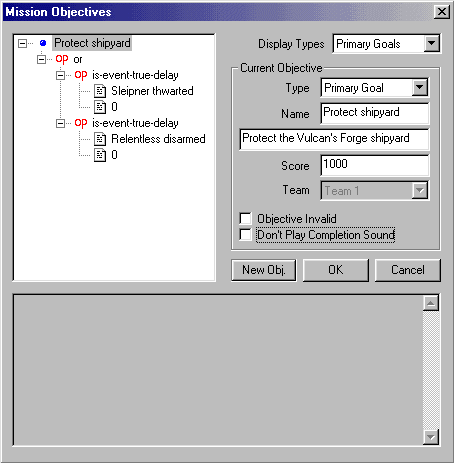
The second objective is a bonus goal, "Protect escape pod". It
should have the text "Protect GTEP Escape Pod", and become true
when that pod has departed. Make it worth 50 points, and have a
completion sound.
Save and test the mission.
|
Messages
|
| |
In the heat of combat, it's very hard to tell what's going on
without radio messages. It's time to put those in.
Before adding the messages, this is a good time to make the NTF
forces show up when they should. Have the first NTF force arrive 23
seconds into the mission, and the second one 137 seconds in.
The first message is the scramble order when the first NTF force
arrives. Create a message called "Incoming!", with the text
"Incoming ... Neo-Terran Front! Two cruisers and some fighters.
Alpha and Beta wings, engage enemy." Use the ANI File
Head-CM1 and the Persona Terran
Command.
For now, use the Wave File emptymsg.wav.
(You'll have to click on Browse to find this.) If you have a
microphone, you can record your own voice file later.
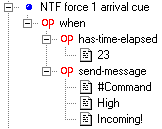
To actually send the message, change the do-nothing
operator in the event "NTF force 1 arrival cue" to
send-message. It should now look like this:
Save and test the mission.
In general, it will sometimes be necessary to create events just for
sending messages. As it happens, all of the messages for this
mission will be attached to existing events. (For each one, replace
a do-nothing operator or use Add Operator.) A
couple of the messages can be triggered by any of several events.
Here are the messages:
| Message |
Text |
Source |
Event(s) |
Files & Persona |
| Pomotep intercepting |
GVCv Pomotep moving to intercept. All fighters,
stand clear of the enemy cruisers. |
GVCv Pomotep |
Pomotep intercepting |
Head-VC
vasudantalk.wav
Large Ship Vasudan |
| Inspect Sleipner |
What are they up to? Alpha 1, inspect one of
those Sleipner transports that just jumped in. |
#Command |
NTF force 2 arrival cue |
Head-CM1
emptymsg.wav
Terran Command |
| Marines? |
Marines? They're trying to steal the Relentless!
Alpha, stop those transports! |
#Command |
Sleipner inspected |
Head-CM1
emptymsg.wav
Terran Command |
| Being boarded |
We're being boarded! |
GTD Relentless |
Relentless boarded |
Head-CM1
emptymsg.wav
Large Ship |
| Too many of them |
There's too many of them! We're going to try to
make it to the escape pods. |
GTD Relentless |
Relentless captured |
Head-CM1
emptymsg.wav
Large Ship |
| Relentless pulling out |
The Relentless is pulling out! Alpha, disable it
before it gets to the jump node. |
#Command |
Relentless pulling out |
Head-CM1
emptymsg.wav
Terran Command |
| Disarm it |
Good work, pilots. Now disable it and we can
send in our own marines later. |
#Command |
Relentless disabled |
Head-CM1
emptymsg.wav
Terran Command |
| We won |
That did the trick! The Neo-Terrans are bugging
out. Good work, pilots. Return to base. |
#Command |
Sleipner thwarted,
Relentless disarmed |
Head-CM1
emptymsg.wav
Terran Command |
| Lost Relentless |
I can't believe we lots a destroyer. Damn!
Okay, return to base. |
#Command |
Relentless escaped,
Relentless destroyed |
Head-CM1
emptymsg.wav
Terran Command |
Guess what: it's time to save and test the mission.
|
Background
|
| |
This mission needs a little scenery. Go read about the Background Editor to see how to add
it. While this mission won't involve any asteroids, this is as good
a time as any to read about the Asteroid Field Editor.
Crank the number of stars up to 2000, and add the following
background elements:
EDITOR'S NOTE: The background angle system was patched in recent
versions of FreeSpace Open. Choose one of the following two tables
according to the version you are using.
Retail and FSO versions before 22.2
| Item |
Pitch |
Bank |
Heading |
Scale |
Bitmap planetf |
325 |
0 |
25 |
5 |
Bitmap neb04 |
0 |
0 |
180 |
2 |
Bitmap neb05 |
0 |
100 |
160 |
3 |
Bitmap neb06 |
20 |
200 |
200 |
3 |
Sun SunRed |
0 |
60 |
90 |
2 |
Sun SunGold |
0 |
65 |
95 |
0.3 |
FSO versions 22.2 and later
| Item |
Pitch |
Bank |
Heading |
Scale |
Bitmap planetf |
31 |
344 |
330 |
5 |
Bitmap neb04 |
0 |
0 |
180 |
2 |
Bitmap neb05 |
0 |
260 |
200 |
3 |
Bitmap neb06 |
19 |
153 |
159 |
3 |
Sun SunRed |
300 |
0 |
270 |
2 |
Sun SunGold |
296 |
0 |
259 |
0.3 |
Save the mission and enjoy the view.
|
Fighters and Bombers
|
| |
Fighters and bombers are added at this late stage for two reasons:
- It's important to make sure that any capital ship combat is
well-balanced first; the fighters and bombers should be the
deciding factor.
- It's very difficult to test other aspects of the mission while
dogfighting.
The first wing to consider, of course, is Alpha wing. Before
placing the rest of them, move Alpha 1 to about (3400, 1600,
-2000) and point it toward GTI Vulcan's Forge. Using Current Ship
viewpoint (in the View Menu), see what the shipyard looks like
from Alpha 1's point of view. Move the ship around a bit to set up
a nice picture.
Now break up Alpha wing and add three more fighters behind it.
Select them all and change them to GTF Erinyes. Here's the full
story on Alpha wing:
| Object |
Class |
Position |
Notes |
| Alpha wing |
GTF Erinyes (x4) |
Approximately 3400, 1600, -2000
|
Initial orders: guard Alpha 1, priority 50
Hotkey: F5
Trebuchets in missile bank 2
|
The initial orders will make the other ships in Alpha wing stay near
the player, provide protection, and attack any targets of
opportunity. Of course, the player can give other orders.
Read about the Reinforcements
Editor.
It doesn't matter where you put the other two friendly wings,
because their Arrival Cues will determine where they appear.
| Object |
Class |
Position |
Notes |
| Beta wing |
GVF Serapis (x4) |
(anywhere)
|
Arrival: Near Ship GTD Relentless, distance 2450
Initial orders: guard GTI Vulcan's Forge, priority
10;
attack any ship, priority 50
Hotkey: F6
|
| Epsilon wing |
GTB Artemis (x4) |
(anywhere)
|
Arrival: Docking bay, GTI Vulcan's Forge
Initial orders: attack any ship, priority 50
Hotkey: F7
Stiletto IIs in missile banks 2 and 3
Reinforcement
|
Save and test the mission. Don't forget to call in the
reinforcements!
Now for the bad guys:
| Object |
Class |
Position |
Notes |
| Scorpio wing |
GTF Hercules (x4) |
(anywhere)
|
Hostile
Arrival: In front of ship NTC Munin, distance 312, when event
"NTF force 1 arrival cue" is true
Departure: When event "Relentless out of picture" is true
Initial orders: attack any ship, priority 50
Waves: 3, 15-30 second delay between waves
|
| Pisces wing |
GTF Ulysses (x3) |
(anywhere)
|
Hosile
Arrival: Near Ship GTD Relentless, distance 2450, when event
"NTF force 2 arrival cue" is true
Departure: When event "Relentless out of picture" is true
Initial orders: guard Sleipner wing, priority
50
Waves: 2, 15-60 second delay between waves
|
Add an event "Scorpio destroyed" which becomes true when Scorpio wing is
destroyed, with directive "Destroy Scorpio". Make a similar event for
Pisces wing. Finally, modify the event "Relentless captured" so that
it also adds a priority 60 order for Pisces wing to guard the
Relentless.
Save and test the mission.
The remaining changes to the mission will not affect balance. Now
is the time to make sure it's not too hard or too easy. You might try
setting the difficulty one notch higher than you normally do; after
all, you have the unfair advantage of knowing what's going to
happen. Also, don't forget to turn off Alpha 1's invulnerability!
If the mission seems out of balance, try adding or removing some fighters.
|
Team Loadout and Mission Specs
|
| |
Read about the Team Loadout Editor
and the Mission Specs
Editor.
In the Team Loadout Editor, uncheck the Myrmidon fighter,
making it unavailable for this mission.
In the Mission Specs Editor,
entitle the mission "Shipyard". Choose "Genesis" for the music.
Enter any Mission Description and Designer's Notes you
feel are appropriate.
Save and test the mission.
|
Debriefing
|
| |
Read about the Briefing
Editor and the Debriefing
Editor. If you do the debriefing first, you won't have to sit
through the briefing to test it.
The debriefing has 5 stages:
| Stage |
Usage |
Text |
Recommendation Text |
| 1 |
event "Sleipner thwarted" true |
Your reaction to the Neo-Terran marine transports was amazingly
quick and effective. We shudder to imagine what might have
happened had the NTF taken over the GTD Relentless.
|
|
| 2 |
event "Relentless disarmed" true |
GTVA marines were able to board the GTD Relentless and capture
the NTF terrorists. We commend you on your quick work disabling
and disarming the destroyer.
|
|
| 3 |
event "Relentless destroyed" true |
The loss of the GTD Relentless will cost the alliance a great
deal. We can take some solace in the fact that the NTF did not
get ahold of the destroyer.
|
Use 'S' to target the Relentless' engines. After it is
disabled, use 'K' to cycle through individual turrets. Don't
forget about your reinforcements!
|
| 4 |
event "Relentless escaped" true |
Not only do we have one less destroyer today, the NTF has one
more. This is a crushing blow to the alliance.
|
Rush over to Sleipner wing as soon as it arrives. Also,
consider giving orders to some of the armed transports in the area.
|
| 5 |
event "Protect escape pod" true |
Fortunately, some of our people on board the GTD Relentless got
away. Without your efforts, that escape pod probably would not
have made it.
|
|
Save and test the mission. If you wish, you can record
.wav files for the debriefing stages.
|
Briefing
|
| |
The last step is the construction of the briefing. Before doing
this, read about the remaining editors:
Shield System,
Command Briefing, and
Campaign.
The briefing will use music Brief1 and have 5 stages.
Enter the text for each stage:
| Stage |
Text |
| 1 |
Today you're on patrol near the $f Vulcan's $f Forge shipyard.
|
| 2 |
In addition to the main installation, there are two docking
rings. In Ring 1, we've just begun construction on the $f GTD
$f Triumphant.
|
| 3 |
In Ring 2, we've nearly completed work on the $f GTD $f Relentless.
The $f GVCv $f Pomotep, which has taken some heavy damage recently, is
next in line.
|
| 4 |
The largest thread is currently the $h Neo-Terran $h Front. Raiders
may come from in-system or through the local jump node.
|
| 5 |
If we get hit by something big, you can call on $f Epsilon $f wing for
reinforcement.
|
Before installing the pictures, it may help to watch the briefing from
the completed version of this mission.
Go back to stage 1. In the main view, move the camera so that you
can see GTI Vulcan's Forge and both docking rings. Zoom in so that
you can just see the center installation. Create an icon
for it (making sure it has Icon Image
Installation), highlight the icon, and save the view.
In stage 2, zoom out until both docking rings are in view. Create
an icon for Ring 1. Change the Label to "GTD Triumphant" and
the Ship Type to GTD Orion. Highlight the icon
and save the view.
In stage 3, create an icon for the GTD Relentless and highlight it.
Also, create an icon for the GVCv Pomotep. (It may be easier to
create an icon for some other object, then modify its Label,
Icon Image, and so forth to correspond to the Pomotep.)
Place the Pomotep icon near the icon for the Relentless. Save the
view.
For stage 4, move the camera so that you can see the jump node.
Create an icon for it. Create another icon nearby, labeled
"Neo-Terran Front", with Icon Image Unknown Wing
and Team Hostile. Save the view.
For stage 5, move back to where you can see GTI Vulcan's Forge. If
necessary, delete any other icons. Place an icon for Epsilon wing
nearby ("Epsilon", Bomber Wing, GTB Artemis). Mark
both icons (by shift clicking) and check Draw Lines Between
Marked Icons. Save the view.
Save and test the mission. Record .wav files if you wish.
Congratulations, you're done! Check out the Internet Links, then start writing up your
plans for the greatest FreeSpace 2 missions ever....
|
|


